


Prepping dinner in the backcountry. Photo: Rebecca Parsons//The Inertia
When it comes to backpacking, cutting weight is the name of the game. Every ounce matters, but it’s important that your gear be high quality because there are no backup options in the backcountry. One of your most important pieces of gear is your stove. Because most stove brands don’t give you the option to try before you buy, we set out to test some of the best backpacking stoves on the market. Read on to learn more about our favorites.
Navigate To: Comparison Table | Buyer’s Guide | Best Camping Stoves
The Best Backpacking Stoves
Best Overall Backpacking Stove: MSR PocketRocket Deluxe
Best Budget Backpacking Stove: GSI Glacier Camp Stove
Runner-Up Best Backpacking Stove: Soto WindMaster Stove
Best All-In-One Backpacking Stove: Jetboil Flash Cooking System
Best Lightweight Backpacking Stove: Snow Peak LiteMax Stove
Best Backpacking Stove For Larger Pots/Pans: Soto Fusion Trek Stove
Best Overall Backpacking Stove
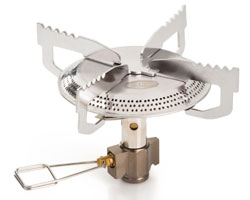
MSR PocketRocket Deluxe ($85)

Pros: Push-start ignition, powerful, fine-tuned simmer control, excellent wind performance
Cons: Pricey
Weight: 2.9 ounces
Dimensions: 3.3″ x 2.2″ x 1.8″
Fuel: Isobutane-propane
The MSR PocketRocket Deluxe is the latest iteration of MSR’s classic backpacking stove. It’s been out for a few years, but so far, nothing beats it for all-around utility. At 2.9 ounces, the Deluxe is nice and light and packs down small, thanks to foldable pot supports. The push-start ignition makes the stove easy to light, and our testers found it stayed functional long after the ignitors on most other stoves gave up the ghost.
Our tester was impressed with how quickly the Deluxe got things heated up — it boiled a small pot of water in a matter of minutes. The temperature was easy to adjust and regulate thanks to the Deluxe’s well-dialed control knob, and the wide burner head heated everything evenly. On top of that, the raised lip around the burner head functions as an effective built-in windscreen. Finally, much of the PocketRocket Deluxe can be disassembled in the field for emergency cleaning.
The price is a little steep, but the PocketRocket Deluxe is lightweight, efficient, easy to use, and powerful. It’s a shoo-in for the best overall backpacking stove.
For more information on the MSR PocketRocket Deluxe, read our full review.
CHECK PRICE ON REIBest Budget Backpacking Stove
GSI Glacier Camp Stove ($40)
Pros: Cost-effective, durable design, easy to set up
Cons: Flame isn’t as concentrated, fuel efficiency
Weight: 5.9 oz
Dimensions: 5 in x 5 in x 3.2 in
Fuel: Isobutane-propane
The GSI Glacier Camp Stove is hands down the most cost-effective camp stove we tested. Compared to the competition, this camp stove is less than half the price. What surprised us the most about this stove, when taking price into consideration, is how durable it is.
This camp stove is the epitome of the perfect beginner backpacker design. Simply take the stove out of the box, spin it onto the fuel canister, and light it. What we love about this stove is that despite being so simple, it’s very rugged and well-crafted. It can boil water in 3.4 minutes, and it is able to hold larger cookware.
The only real cons of this stove are fuel efficiency and burner design. Because of the larger burner, and having no windscreen, we found that fuel efficiency wasn’t as good as some of the smaller stoves we tested. Additionally, because the burner ring is wider than other camp stoves, the handles on our cooking pot got hot and we had to wait for them to cool off.
Check Price on REI
Simple, durable, and effective, the GSI Glacier is an inexpensive and reliable backpacking stove. Photo: Rebecca Sperry//The Inertia
Runner-Up Best Backpacking Stove
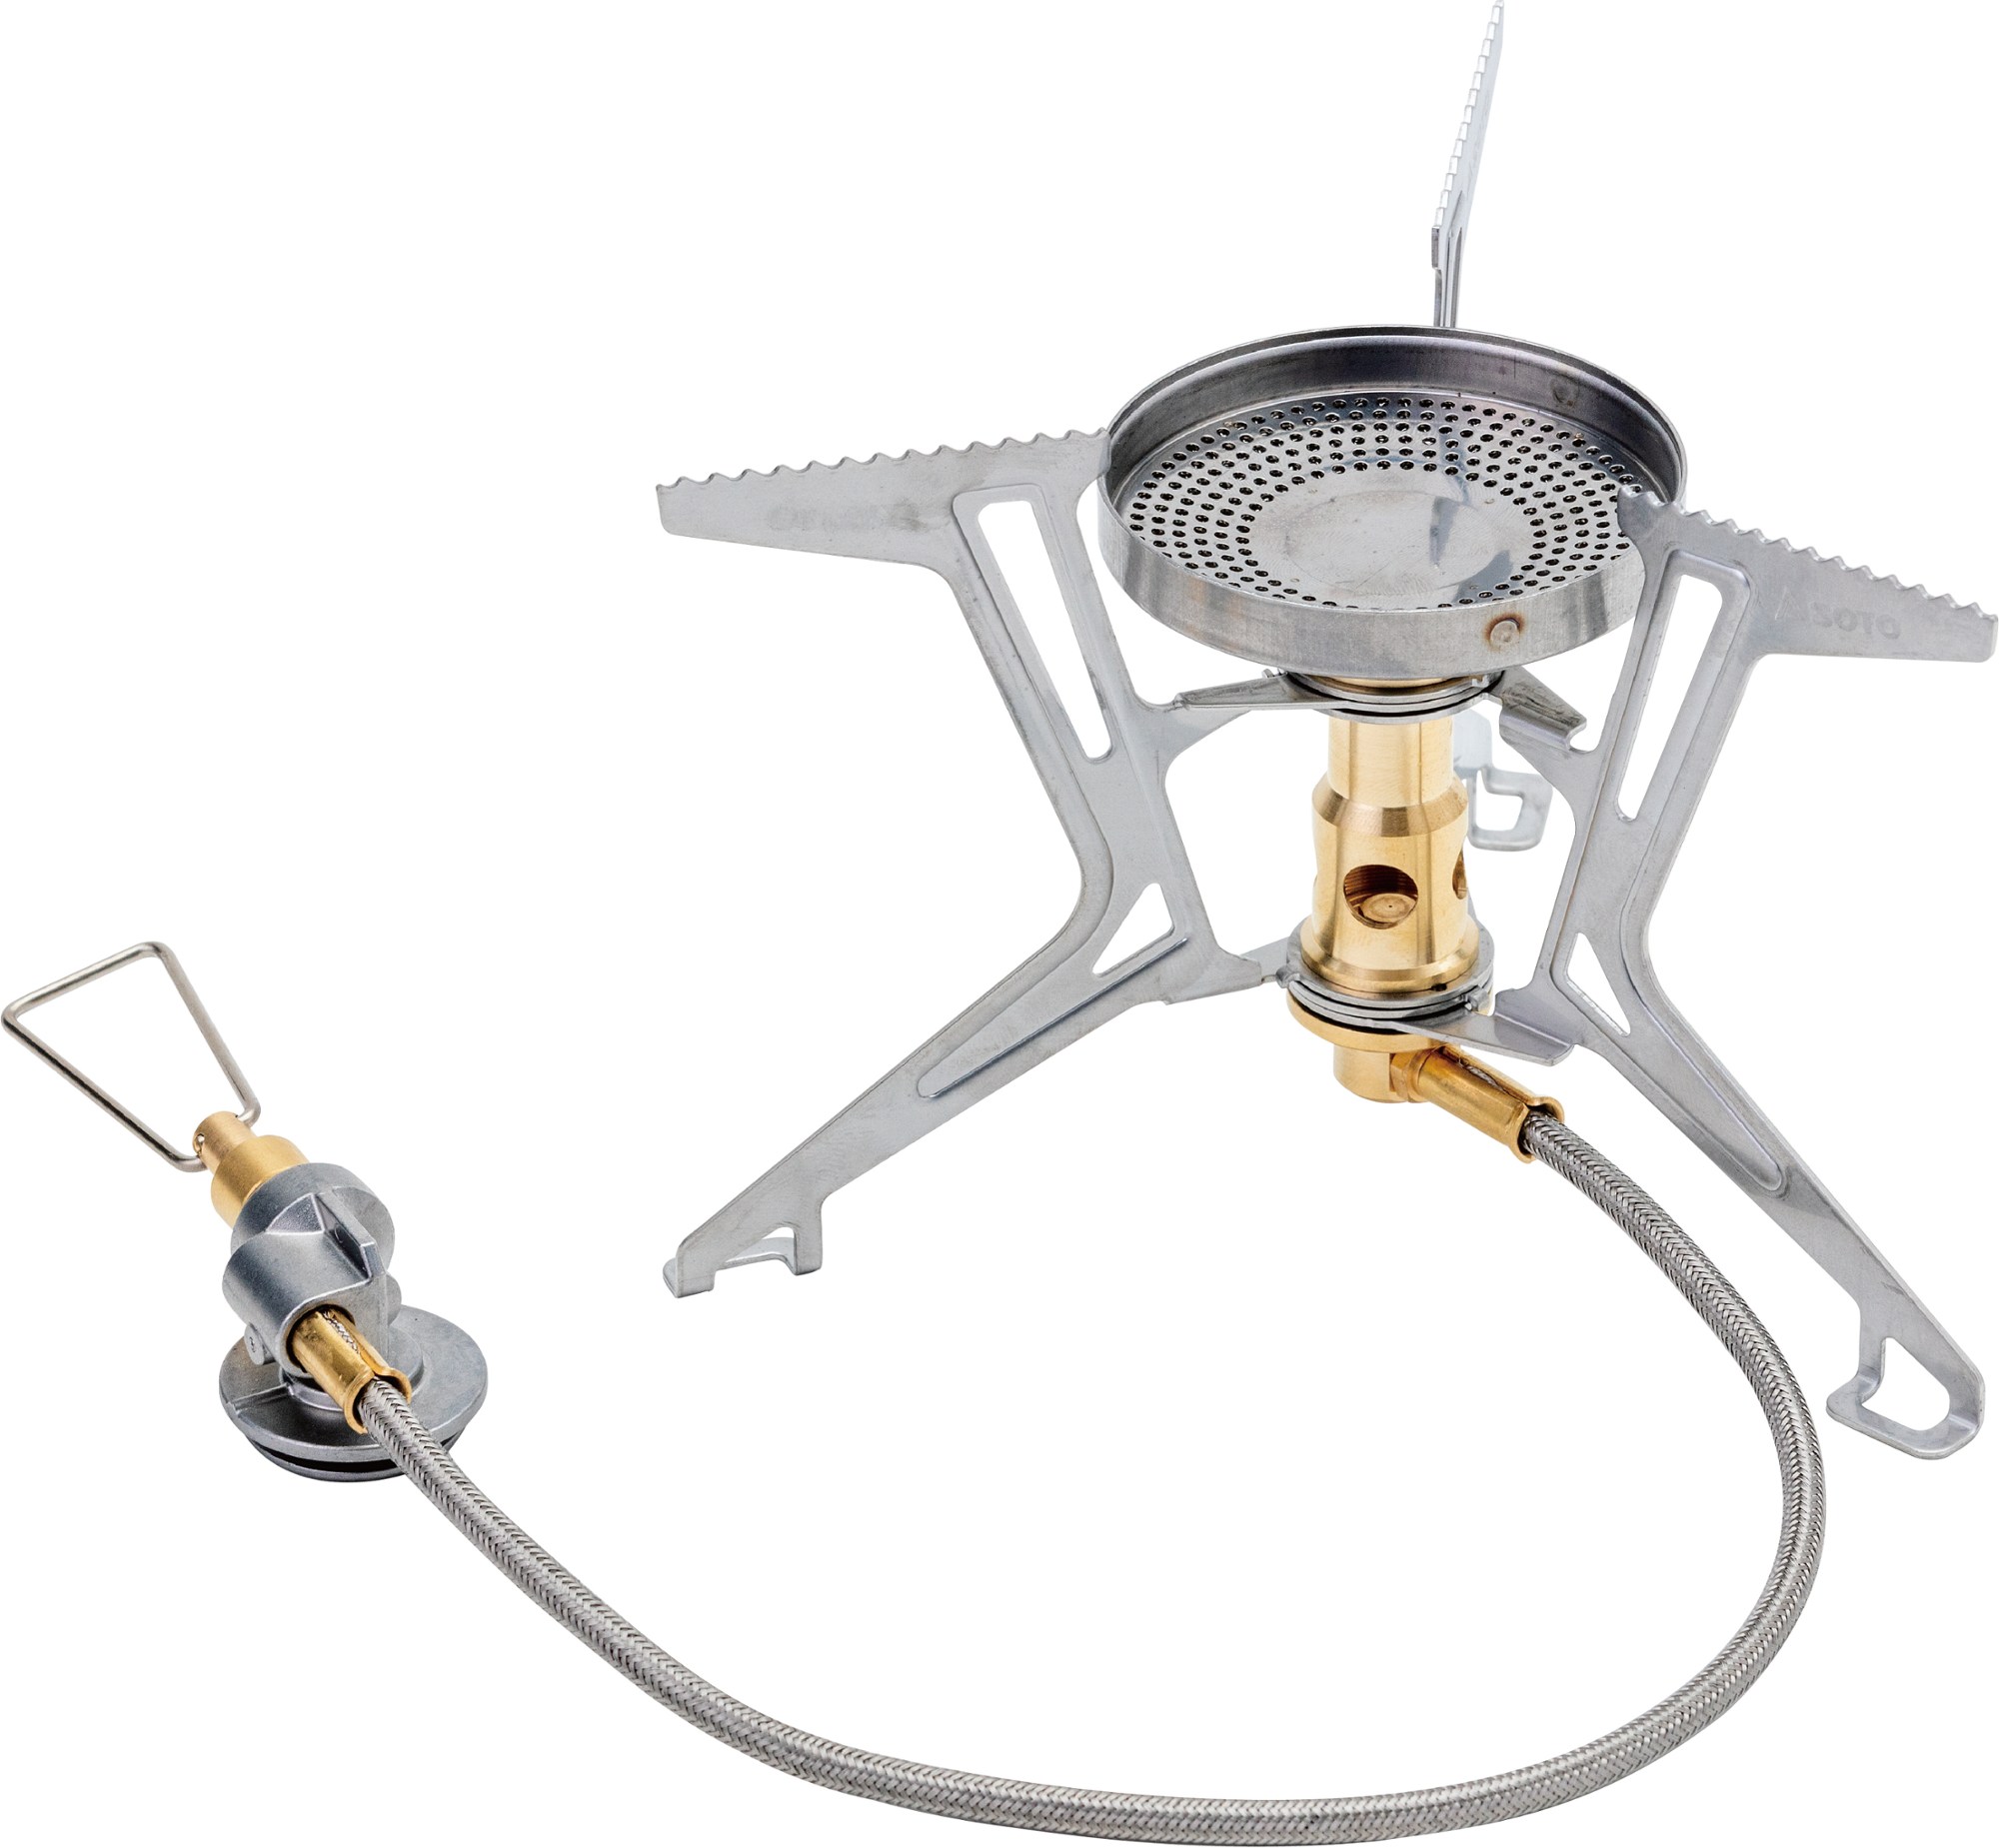
Soto WindMaster Stove ($70)

Pros: Fantastic in the wind, push-start ignition, can accommodate larger pots
Cons: Difficult to set up
Weight: 3.1 oz
Dimensions: 5.7″ x 3.8″ x 1.3″
Fuel: Isobutane-propane
The Soto WindMaster Stove features a deep lip that protects the burner head from wind, and the pot supports keep cookware low to the flame. Between those two factors, the WindMaster lives up to its name. Our lead tester experienced 20 mph gusts while field testing and the flame didn’t so much as flicker. It’s the way to go if you plan on cooking dinner in exposed areas while backpacking.
One downside is the challenging setup before first use. The metal prongs on which your pots rest do not come attached to the stove, so you have to attach them before you can get started. Of all the stoves we tested, this was the only one that required our tester to pull out the instruction manual to figure out how to attach everything. Once you get everything set up, the WindMaster works great. Luckily, when you’re finished using the WindMaster, you can leave the metal prongs attached, fold them up, and store the entire stove in the included bag.
The quad-style pot supports kept cookware stable, but we wouldn’t necessarily say more stable than a classic tri-style setup. However, that extra prong allowed the stove to accommodate larger pots, a definite bonus.
CHECK PRICE ON REIBest All-In-One Backpacking Stove
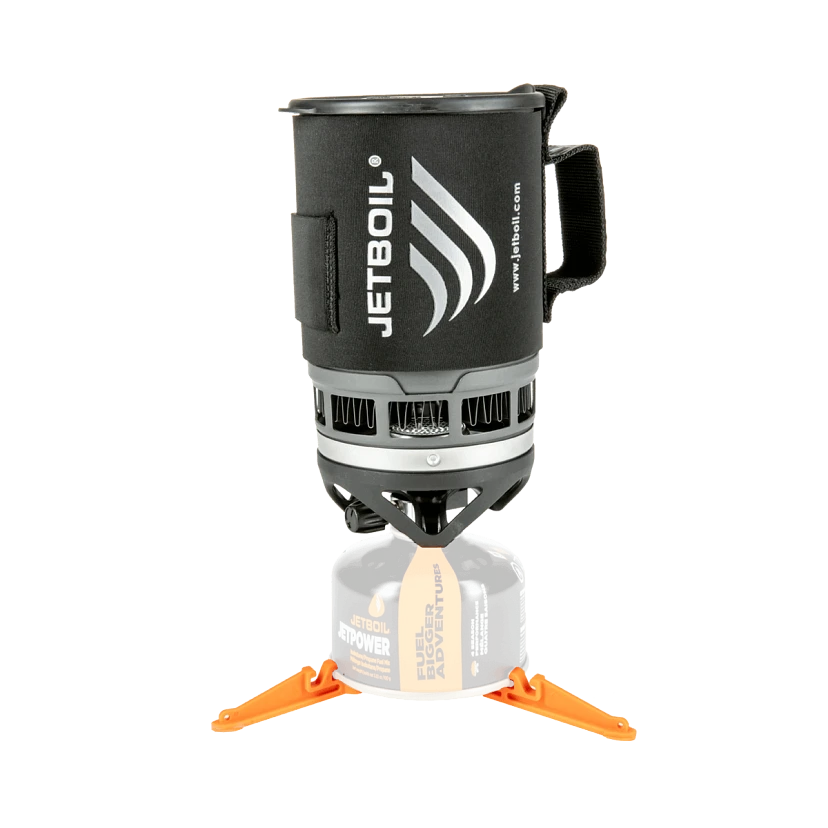
Jetboil Flash Cooking System ($145)

Pros: Feature-rich, Boil time
Cons: Size, Weight, FluxRing design
Weight: 13.088 oz
Packed Dimensions: 4.1 in x 7.1 in
Fuel: Isobutane-propane
The heavily feature-rich Jetboil Flash Cooking System is the perfect camp stove for someone who loves all the bells and whistles. Designed to be super user-friendly and perhaps a bit aesthetically pleasing, the Jetboil is not without its cons, though. Comparable pricing, and the fastest boiling time for the three stoves we tested, the Jetboil certainly holds its own in the backpacking realm.
Fuel efficiency and lightning-fast boil time are the main features of the Jetboil cook system. It took our water exactly 2.5 minutes to go from lukewarm to a roaring boil, shaving a full minute off of the two other camp stoves we tested. The push-button igniter means you don’t need to use a lighter at all to get this stove cooking and is very easy to use. The thermochromatic color-change sleeve changes color to let you know that your water is warm, a really unique feature that we appreciate.
The FluxRing design was a pretty major con for us when testing this stove. After twisting the base onto the cooking pot and boiling our water, we were not able to get the base detached from the cooking pot. This could be a potential defect in our stove, but it was quite frustrating. Furthermore, the size of this cooking system was less than ideal for our tester. The 1-liter pot is only supposed to be halfway filled with water. The large size of this cooking pot seems unnecessary if you’re only using half of the pot to boil water. That said, everything packs into the stove and makes this all-in-one unit the best on the market for versatility.
Check Price on REI
The Jetboil Flash is a contained system that is fast and packs into itself. Photo: Rebecca Sperry//The Inertia
Best Lightweight Stove
Snow Peak LiteMax Stove ($45)
Pros: Ultra lightweight and packable, durable
Cons: Can’t accommodate larger pots/pans, loud, terrible in the wind
Weight: 1.9 oz
Dimensions: 3″ x 2.7″ x 1.3″
Fuel: Isobutane-propane
Made from titanium, the SnowPeak LiteMax Stove is far and away the lightest stove on our list. Weighing just 1.9 ounces, it is insanely lightweight and packs down into a pouch so small you might lose it in your pack. Aside from its weight and size, there’s nothing special about the LiteMax stove: it does what it does and does it reasonably well at a decent price point.
Thanks to the titanium and anodized aluminum, the LiteMax is simultaneously lightweight and durable. Because it’s so small, the LiteMax can only accommodate small, solo backpacking-style cookware. The upshot is if you have a larger group or wish to use larger pots/pans, this stove isn’t the best fit.
For some reason, the LiteMax came with a metal tag attached to it, which we found annoying if we left it on but challenging to remove. Another drawback? The stove is surprisingly loud. Finally, while the LiteMax is powerful and boils water quickly, one of our testers found its performance suffered greatly in the wind. Note the difference in the burner head design compared to the PocketRocket Deluxe or Soto Windmaster. It’s utterly exposed to the elements, and even light breezes decrease efficiency.
That being said, the Snow Peak LiteMax will be our go-to for backpacking trips when space and weight are especially essential.
CHECK PRICE ON REIBest Backpacking Stove For Larger Pots/Pans
Soto Fusion Trek Stove ($100)
Pros: Capable of supporting larger pots/pans, stable cooking surface
Cons: Larger/heavier than similar stoves
Weight: 6.4 oz
Dimensions: 16.9″ x 5.5″ x 3.9″
Fuel: Isobutane-propane
Rather than screwing directly to a fuel canister, the Soto Fusion Trek Stove features an external hose that connects to the canister. There are both pros and cons to this design.
The upside is that the stove itself has legs, resulting in a much more stable cooking surface. Additionally, the burner head can be a tad larger, making it capable of supporting larger pots and pans while remaining stable. Finally, systems like this allow you to invert your fuel canister while the stove is in use, a handy feature when cold weather begins to diminish the efficiency of pressurized Isobutane-propane.
The downside? It’s an additional piece of equipment, resulting in a bulkier, heavier stove.
Our lead tester found that she had to crank the fuel pretty high to get it to come out, but once it was going the stove was easy to light and got water boiling quickly. She did most of her testing on a windy day (15-20 mph winds), and the stove remained lit the entire time she was cooking (note the raised lip on the burner head).
The Fusion Trek was easy to assemble and disassemble; we only wish it came with a bag for storage.
CHECK PRICE ON REIBest of the Rest
Awesome Efficiency
Jetboil Zip Cooking System ($110)
Pros: Boils water in two minutes, easy to use
Cons: Not great for cooking anything besides water, bulky, somewhat heavy
Weight: 12 oz
Dimensions: 4.1″ x 6.5″
Fuel: Isobutane-propane
The Jetboil Zip Cooking System is easy to use and super-efficient. The Zip can boil water in just over two minutes, the fastest of all of the backpacking stoves that we tried. That’s because the Zip, like many Jetboil stoves, utilizes an insulated cooking pot paired with a baffled heat-exchange system. It’s not the lightest way to boil water, but it’s fast and sips fuel.
The bottom portion of the Zip doubles as a measuring cup/bowl, which we found helpful for making backpacking meals. The lid has a pour spout, and the pot has a handle, both of which help avoid burns when pouring out water.
Something unique about the Zip is that it comes with a fuel canister stabilizer. We didn’t use the stabilizer most of the time, but when the surface was uneven, we found it helpful.
The Zip has minimal simmer control, so while it was great for boiling water for oatmeal, coffee, and backpacking meals, it wasn’t the best for cooking. The Zip is definitely larger than many of the stoves on this list, but everything packs neatly into the Zip’s pot to save space.
For more information on the Jetboil Zip, read our full review.
CHECK PRICE ON REIAnother Versatile Backpacking Stove
Trangia 27-5 UL Stove ($128)
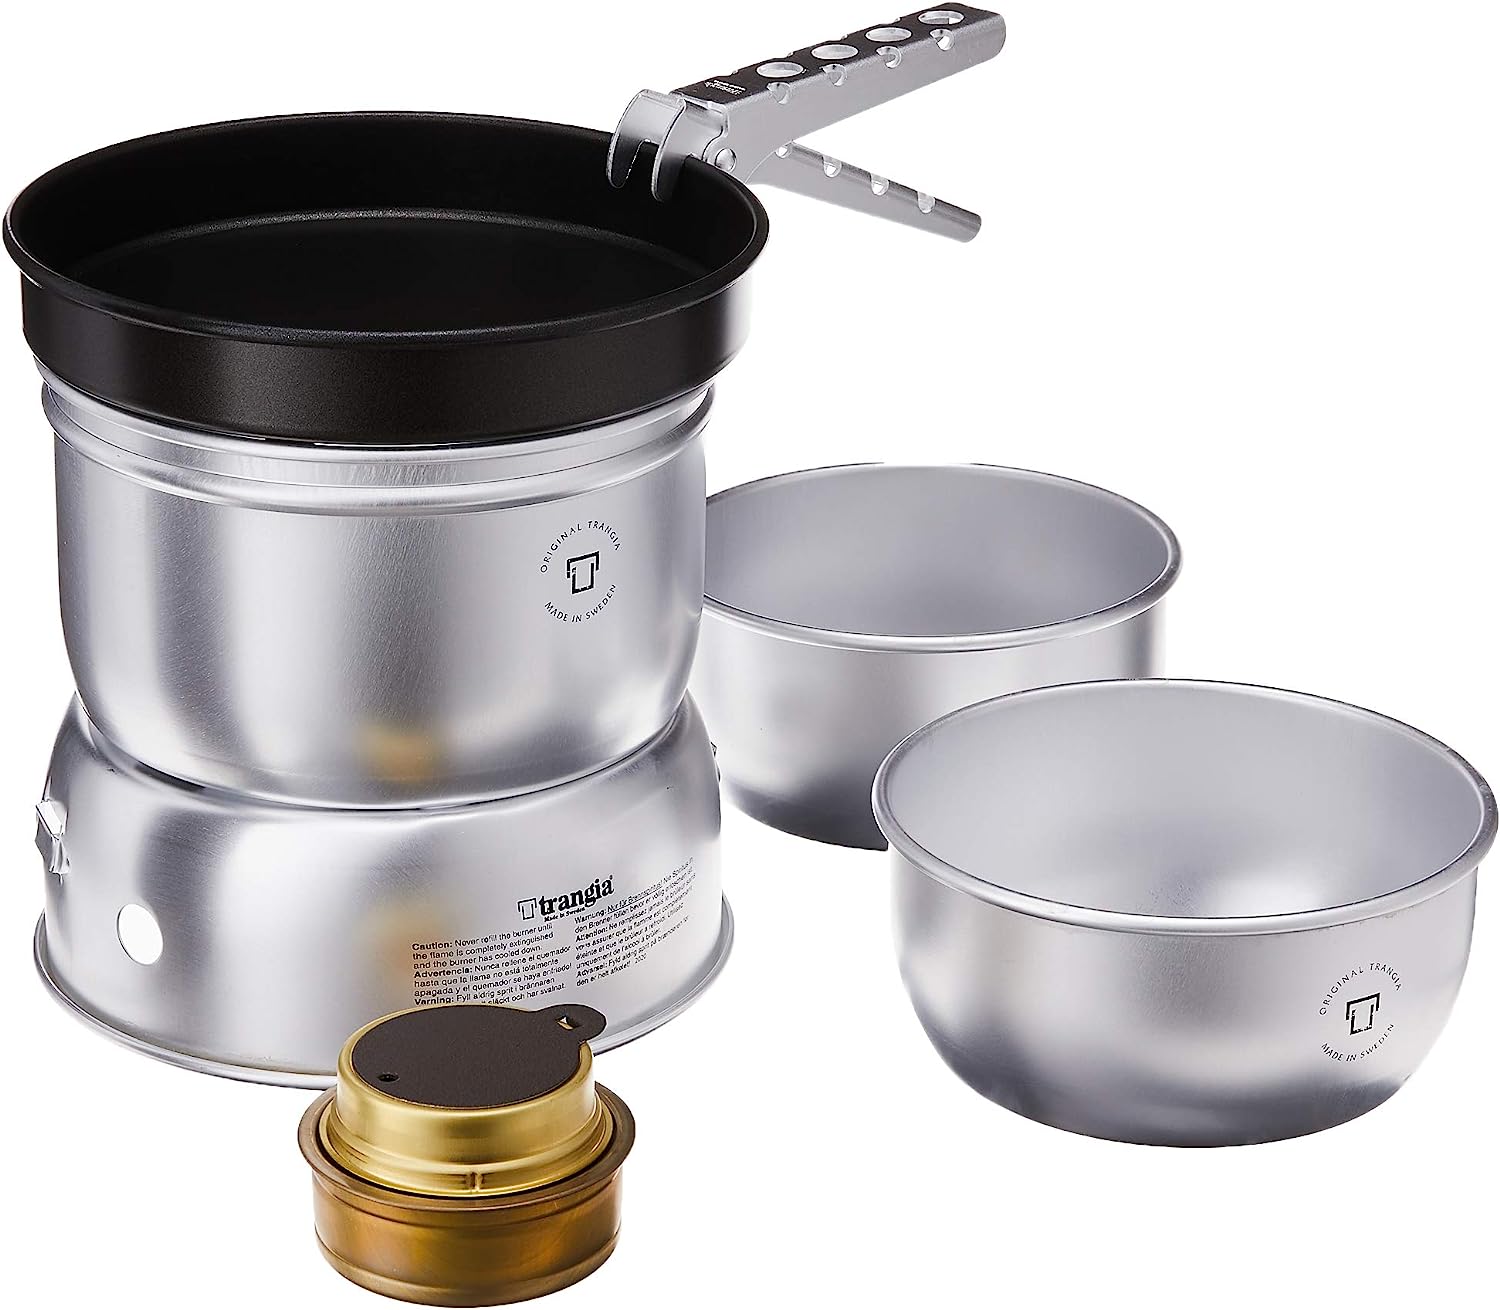
Pros: Works with any alcohol-based fuel, comes 8with pots/pans
Cons: Doesn’t pack down as small as most stoves, takes longer to boil water
Weight: 1.9 lbs
Dimensions: 7.52″ x 7.48″ x 4.25″
Fuel: Any alcohol-based fuel
The Trangia 27-5 Ultralight Stove was one of the most unique stoves on our list. Where most stoves require a fuel canister, Trangia’s stoves work with any alcohol-based fuel. That being said, denatured alcohol — commonly used as a cooking fuel on ships because it burns cleanly — is your best bet. Aside from a burn that produces no carbon monoxide, the other advantage to using denatured alcohol is that it is usually widely available in areas of the world where fuel canisters are hard to find.
The stove comes with a small compartment that you pour the fuel into. Light, set your pot in place, and boil away. Note that alcohol stoves, this one included, don’t boil water as quickly as stoves that use pressurized fuel canisters. Also, the only way they go out once you’ve lit them is when the fuel runs out. That’s led land management agencies in many parts of the American West to ban them entirely. So do your homework before heading out into the woods with this bad boy.
The Trangia stove comes with two pots, a frying pan, a windscreen (important for alcohol stoves), a burner, a pot grip, and a strap. Everything packs together exceptionally well and is stacked in an origami fashion to minimize space. Although this stove is bigger and heavier than most of the stoves we tested, the pots/pans are part of the package. When you factor in the cookware, the weight penalty isn’t (quite) as prohibitive as it first seems.
From a usability standpoint, we found that the Trangia stove was easy to light and cook on, and the pots doubled nicely as bowls. All in all, we appreciated how simple yet effective the design of this stove is and how much versatility it brings to backpacking trips off the beaten path.
Check Price on AmazonLightweight Four-Season Stove
GSI Pinnacle 4 Season Stove ($80)
Pros: Ideal for cold weather
Cons: Doesn’t perform as well in windy conditions, Legs and pot supports are cumbersome to open and close
Weight: 5.7 oz
Dimensions: 2” x 1.8” x 3.2”
Fuel: Isobutane-propane
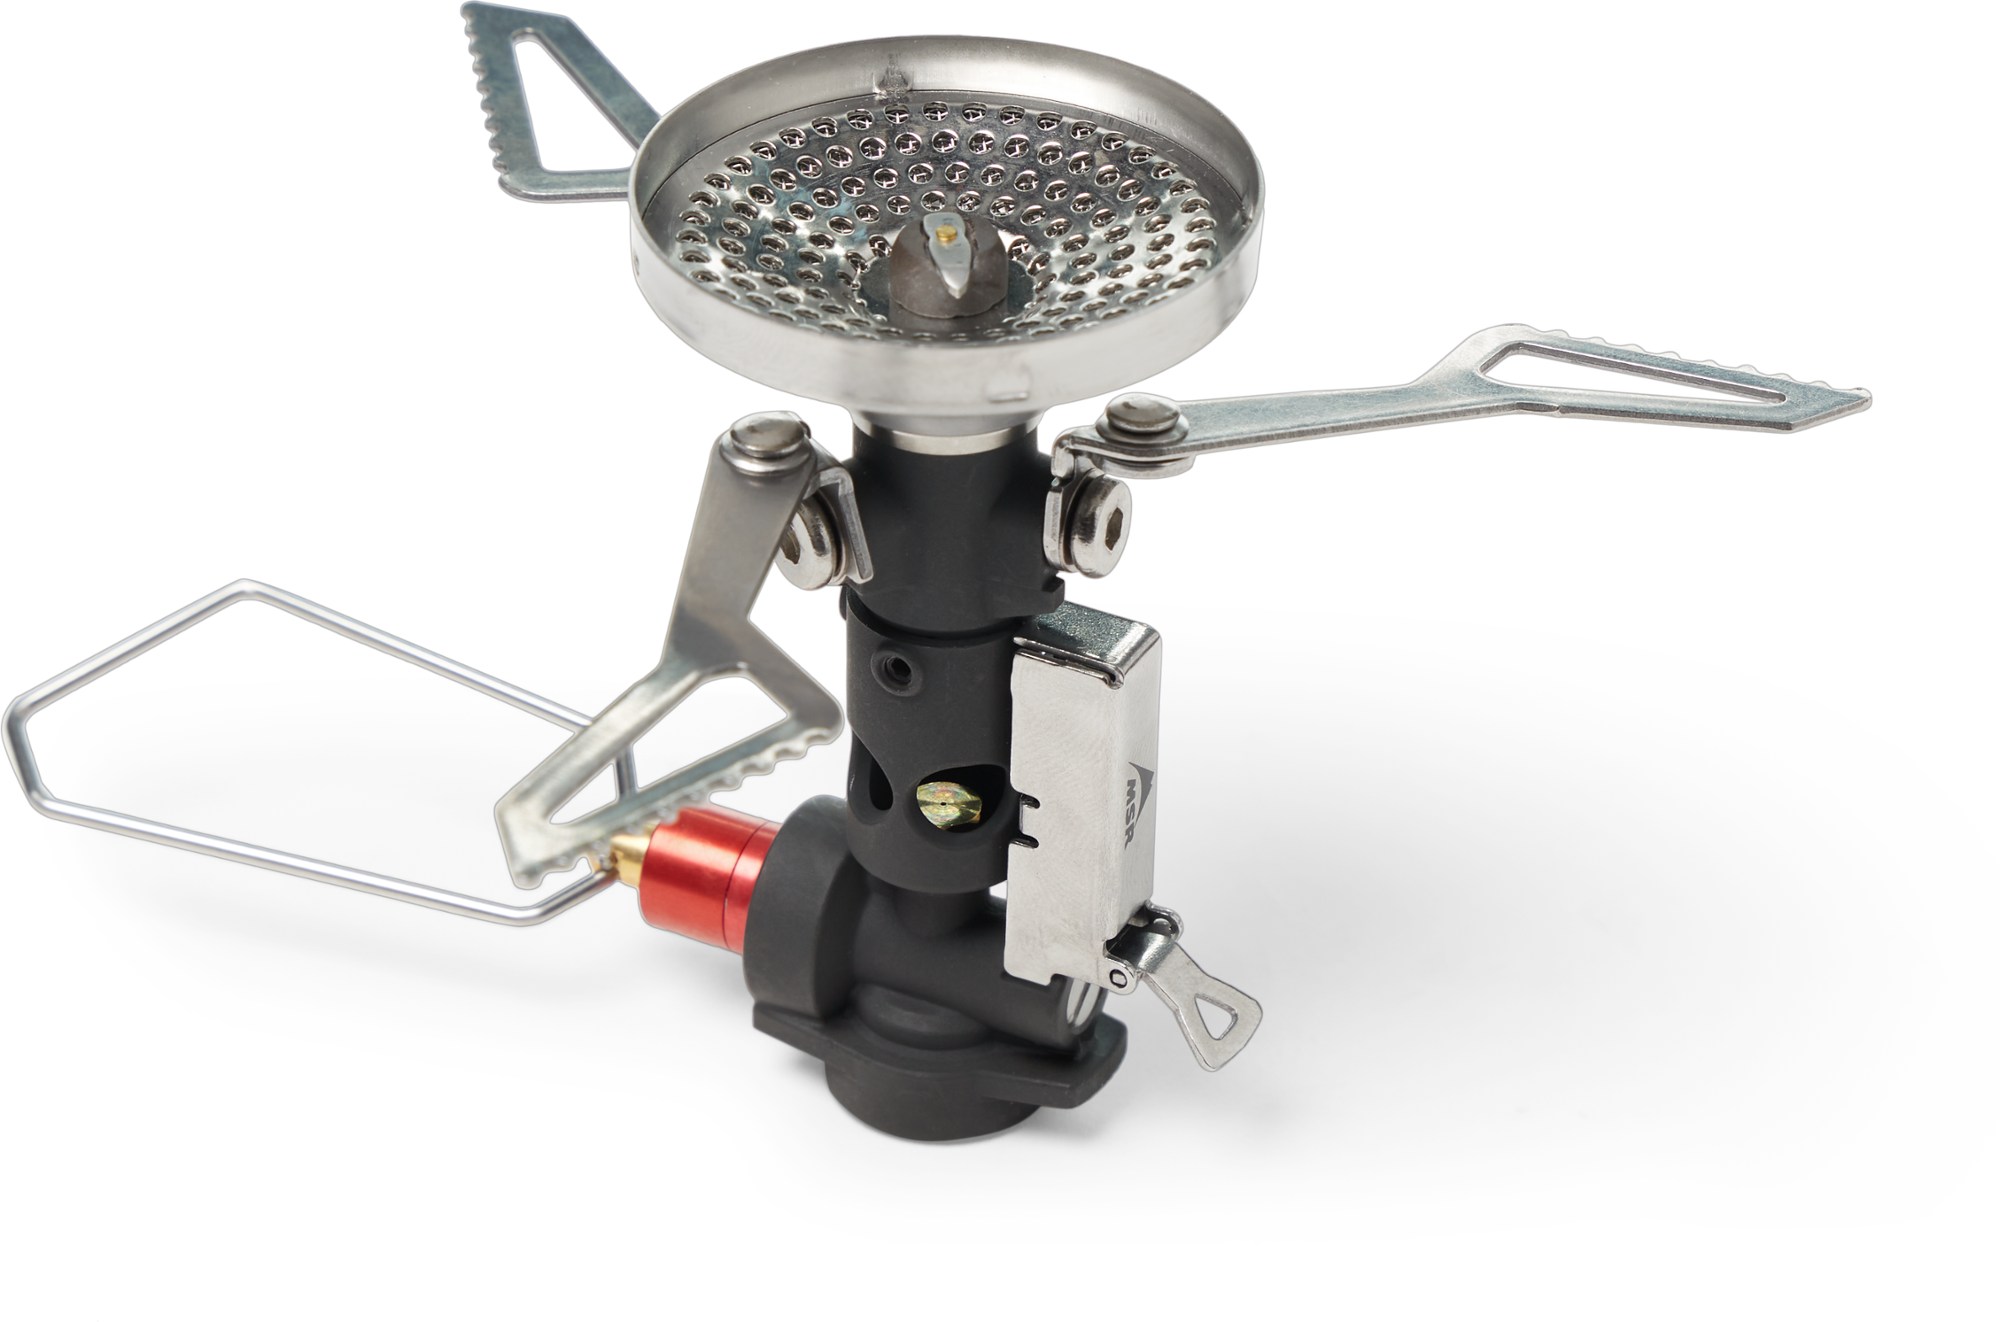
Similar to the Soto Fusion Trek, the GSI Pinnacle 4 Season Stove has an external hose that connects to the fuel canister. This stove is designed for cold-weather camping. The remote stove design comes with both pros and cons.
We’d be remiss if we didn’t mention the main feature of this stove which is that it’s specifically designed to perform better in colder temperatures. Because the fuel canister is attached by a hose and not fixed to the burner, you can flip it upside down to get better fuel efficiency in cooler weather, at higher elevations, or if the canister is running low. An additional pro of this stove is that it is small enough to be easily compacted down inside of your cooking pot along with your fuel canister, which we love. Another pro was the boiling time. It took exactly 3.5 minutes to go from lukewarm water to a roaring boil which we found really impressive.
One of the cons of this stove is the lack of a windscreen. We didn’t have any issues with the wind because we didn’t test this stove in windy conditions, however, it is clear that in wind, the flame will be impacted without a windscreen. Figuring out how to open and close the support legs and stove supports was a bit difficult the first time we tested the stove but once we figured them out this feature was not a major issue. The only other potential con in terms of the design of this stove was that it doesn’t come with a way to stand the canister upside down, you will need to stabilize the canister using rocks, etc so that it remains in place on uneven ground.
Check Price on BACKCOUNTRY Check Price on AMAZON
MSR WindBurner Duo Stove System ($230)
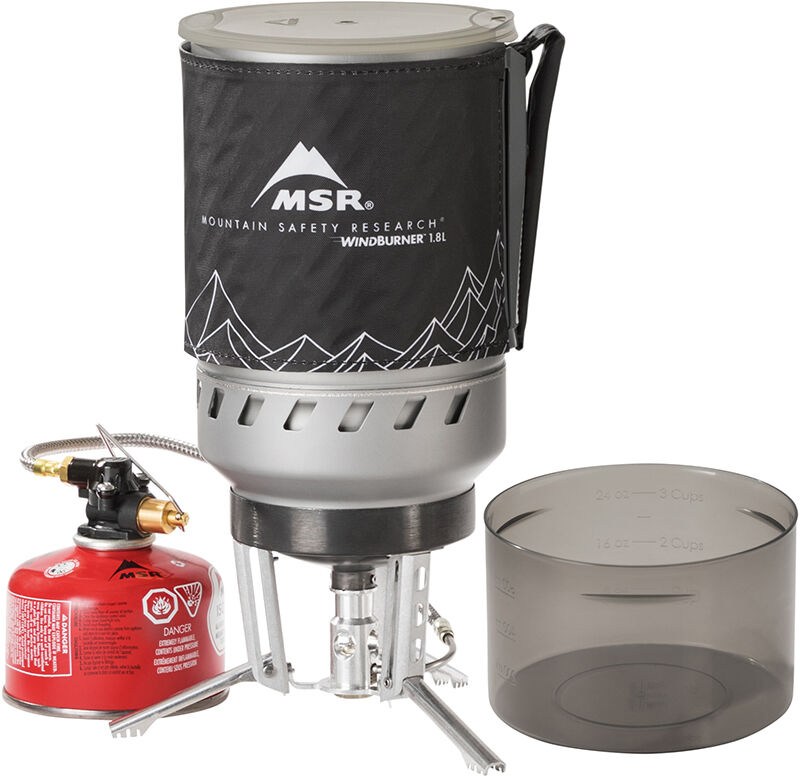
Pros: Ideal for cold weather, great in the wind
Cons: Large and relatively heavy, expensive
Weight: 1 lb. 5.1 oz.
Dimensions: 5″ x 8″
Fuel: Isobutane-propane
The MSR WindBurner Duo Stove System is similar to a JetBoil in that it’s an integrated system featuring heat-exchanging baffles, an insulated cooking pot with a handle, and built-in wind protection.
That combo makes for a powerful and efficient cooking system in cold and windy conditions — especially when the added utility of the remote-style fuel system comes into play.
the MSR WindBurner Duo comes with a plastic measuring cup, which we found helpful for measuring water. It also doubled nicely as a bowl. The lid for the measuring cup also fits on the pot and includes a pour spout, which was a game changer for pouring out boiling water.
Although the stove is on the large side, everything packs down into the pot, and it boils a large pot of water in minutes. It may not be small, but it is definitely lightweight for its size. To top it off, the 1.8-liter pot is large enough to boil water for two. That means you can offset the weight and bulk somewhat on group trips by sharing a stove.
MSR wants you to light this stove in a very specific way. Click here to watch a short video showing the proper lighting technique.
CHECK PRICE ON REIBackpacking Stoves Comparison Table
| Stove | Price | Weight | Dimensions | Average Boil Time (1L, sea level) | Fuel |
| MSR PocketRocket Deluxe | $85 | 2.9 oz | 3.3″ x 2.2″ x 1.8″ | 3 min 18 sec | Isobutane-propane |
| GSI Glacier Stove | $40 | 5.9 oz | 5″ x 5″ x 3.2″ | 3 min 24 sec | Isobutane-propane |
| Soto WindMaster Stove | $70 | 3.1 oz | 5.7″ x 3.8″ x 1.3″ | 4 min 2 sec | Isobutane-propane |
| Jetboil Flash | $145 | 13.1 oz | 4.1″ x 7.1″ | 2 min 30 sec | Isobutane-propane |
| Snow Peak LiteMax Stove | $45 | 1.9 oz | 3″ x 2.7″ x 1.3″ | 4 min 25 sec | Isobutane-propane |
| Soto Fusion Trek Stove | $100 | 6.4 oz | 16.9″ x 5.5″ x 3.9″ | 3 min 50 sec | Isobutane-propane |
| Jetboil Zip Cooking System | $110 | 12 oz | 4.1″ x 6.5″ | 2 min 30 sec | Isobutane-propane |
| Trangia 27-5 UL Stove | $128 | 1.9 lbs | 7.52″ x 7.48″ x 4.25″ | 8 min | Any alcohol-based fuel |
| GSI Pinnacle 4-Season | $80 | 5.7 oz | 2″x 1.8″ x 3.2″ | 3 min 30 sec | Isobutane-propane |
| MSR WindBurner Duo Stove System | $230 | 1 lb 5.1 oz | 5″ x 8″ | 4 min 30 sec | Isobutane-propane |
How We Tested the Best Backpacking Stoves
Our lead tester, Rebecca Parsons, has spent her fair share of time on the trails and in the backcountry. To test these backpacking stoves, she hit the trails near her home on Oahu. She also went backpacking on Maui and the Big Island with her husband to further test each stove, as well as a weeklong sea kayaking trip in Palau. Hawaii is often windy and has had especially powerful gusts this year, so she truly got to see how well each of the stoves performed in windy conditions.
Other testers included Rebecca Sperry and Nathan Lemin, who tested backpacking stoves in a variety of backcountry conditions from the Northeast to the Southwest. Rebecca conducted precision tests on boil time, user-friendliness, and packability. Nathan compared subjective features and overall ease of use.

Beachfront dining thanks to the Trangia 27-5 UL Stove. Photo: Rebecca Parsons//The Inertia
Backpacking Stoves Buyer’s Guide
Types of Backpacking Stoves

Upright canister stoves are common, and usually less expensive, more packable, and more durable than other options. Photo: Matt Medendorp//The Inertia
Upright Canister Backpacking Stoves
As the name suggests, an upright canister stove is a stove that screws directly onto a fuel canister. The canister serves as the base for the stove, keeping it in an upright and stable position. Canister stoves are typically the most affordable and also the lightest option.
Canister stoves are easy to light, and adjusting the flame is usually simple. They allow for more precise cooking as they can be used at max flame to boil and low flame to simmer. These types of stoves don’t come with pots or pans, so you will have to purchase them separately. Be sure to factor in the added weight and cost of pots/pans when comparing stoves.

Integrated canister stoves typically pack into themselves—there are pros and cons to this design. Photo: Rebecca Sperry//The Inertia
Integrated Canister Backpacking Stoves
Integrated canister stoves still screw directly into a fuel canister, but the pot and stove are one unit. Built into the junction between the burner head and the bottom of the pot are heat exchangers or baffles. These types of stoves also frequently have built-in windscreens around the whole assembly. The two integrated canister stoves in this guide also use insulated cooking pots. The combination of all those design factors means integrated canister stoves boil water quickly and efficiently and often perform well in the wind.
Because of their high temperatures, integrated stoves can be challenging to cook in, although it is possible. We found that integrated stoves are best for folks who are eating meals that only require boiling water. Integrated canister stoves tend to be heavier, bulkier, and more expensive than upright canister stoves. But they do come with the pot — something to consider.

Remote canister backpacking stoves add versatility in cold weather or high elevations. Photo: Rebecca Sperry//The Inertia
Remote Canister Stoves
Remote canister stoves use fuel canisters just like upright and integrated canister stoves but utilize a hose to screw into the top of the canister. As demonstrated by the two remote canister stoves in this guide, this strategy allows the stove and burner assembly to be a little larger and more stable. It also allows users to invert the canister when needed. This is a handy tactic because it lets your stove burn the liquid fuel inside the canister instead of the pressurized gas. Why does that matter? Because in extreme cold, high altitude situations, or when the fuel runs low, pressurized canisters lose efficiency and power. Inverting the fuel canister can mitigate that situation a bit.
Other Types of Backpacking Stoves
Some backpacking stoves are built to burn a variety of liquid fuels, such as white gas or even gasoline. Others are made to burn alcohol-based fuels, such as denatured alcohol. Still others are constructed with twigs and small sticks or even chemical fuel tablets in mind. We’ll be adding more alternative-fuel backpacking stoves to this guide as testing progresses. See our section “Types of Fuel for Backpacking Stoves” (immediately below) for more information.

The Jetboil Zip Cooking System is a classic example of an integrated canister stove. Photo: Rebecca Parsons//The Inertia
Types of Fuel for Backpacking Stoves
The type of fuel you need depends on the type of stove you have. Some stoves work with different types of fuel, but most are limited to one type, such as liquid or pressurized gas.
Gas Fuel
Gas fuel comes in pressurized canisters and is the most common type of fuel for backpacking stoves. The gas is usually butane, isobutane, and/or propane. All but one of the stoves on our list used Isobutane-propane.
Gas fuel is easy to light, has good flame control, and stays good for years. However, it can be tricky to light in cold temperatures or high altitudes, is difficult to find in less developed countries, and performs poorly when the fuel is running low. Judging how much fuel you have left can also sometimes be tricky.
Liquid Fuel
As the name suggests, liquid fuels come in a liquid form. The liquid is converted to its gaseous form once it’s lighted. Common liquid fuels include kerosene, unleaded petrol, and white gas. Liquid fuel stoves typically have a refillable fuel tank that has to be pressurized by hand before use.
The perks of liquid fuel are that it works well in cold weather and high altitudes (because you can pressurize according to your needs), it’s available in most countries, and it’s easy to take the exact amount of fuel you need.
Some of the challenges of liquid fuel are that stoves that use it are typically more expensive and heavier and require refueling and maintenance. You also must prime the stove each time you use it when you’re working with liquid fuel.

Most of the stoves we tested utilized Isobutane-propane gas fuel. Photo: Rebecca Parsons//The Inertia
Other Fuels
Although gas and liquid fuel are by far the most common, some stoves work with twigs, solid fuel, or alcohol. The Trangia stove worked with any alcohol-based fuel.
The advantage of these fuel sources is that they are widely available. Denatured alcohol burns without creating carbon monoxide, making it a good choice if you plan on cooking in enclosed spaces. Even so, we don’t recommend vestibule cooking because of the fire hazard it creates.
Another advantage to using denatured alcohol is that it can be stored in a plastic bottle, a much lighter alternative to the heavy metal bottles that store gas fuel mixtures.
How Much Fuel Should I Bring?
Running out of fuel on a backpacking trip is no good. Before setting out, plan out your meals and then estimate your water and fuel accordingly. A good rule of thumb is to plan on boiling one liter of water per person per meal.
Then, look up your stove’s boil and burn times to estimate how much fuel you will need. Factors such as wind, air temperature, elevation, and whether you are simmering or boiling can affect how much fuel you use. Error on the side of too much fuel rather than too little.
What Should I Do With My Fuel Canister When I’m Finished With It?
If you’re heading home but you still have some fuel left in your canister, you have a few options. You can check and see if any hikers getting started would like your leftover fuel, or you can bring it home to save it for your next adventure. If you wish to dispose of it, many gas stations or garages will allow you to dump it in their waste. If your canister is empty, contact your town’s recycling center to see if they allow empty canisters in the bin for curbside pickup.

Some of the of the many backpacking stoves we tested. Photo: Rebecca Parsons//The Inertia
Backpacking Stoves: What to Look For
Weight
When you’re backpacking, every ounce of weight counts. When we’re in the market for a stove, we want something that is lightweight yet high quality. The stoves on our list ranged from 1.9 ounces for the lightest to 1.9 pounds for the heaviest. However, our heaviest stove came with two pots and a pan, which accounted for some of the weight.

At 1.9 ounces, the Snow Peak LiteMax Stove is the lightest of all the stoves we tested and packs down small. Photo: Rebecca Parsons//The Inertia
Size
Like weight, size is a key factor to consider when backpacking. The smaller, the better, but sometimes you sacrifice quality when going as small as possible. Smaller stoves can typically only accommodate small pots, making them best suited for one or possibly two people. Some of the heavier and larger stoves could support larger cookware but come with added weight. Consider who you will be cooking for and factor in your priorities before deciding on a stove.
Ease of Use
After a long day on the trail, the last thing you want is a challenging cooking situation. We want a stove that is easy to set up and tear down. We’re okay with reading some instructions upfront, but after skimming the manual, we want to feel comfortable using the stove.

The legs on the MSR WindBurner Duo Stove System provide added stability. Photo: Rebecca Parsons//The Inertia
Stability
Not only is a wobbly stove annoying, but it’s also dangerous. A knocked-over stove can result in burns or even a forest fire, so it’s super important to make sure your stove is stable before you begin cooking. Always make sure you are cooking on as flat and even a surface as possible.
The design of your stove will affect its stability. If your stove doesn’t attach directly to the fuel canister, you want to make sure it has a reliable base. Then, you’ll want to make sure that your pot is supported and won’t slip off. The number and design of the metal pot supporters play a huge role in this. Some stoves come with three arms, while others come with four. The aggressiveness of the teeth on pot supports also varies.
It’s also important to make sure you’re using a size-appropriate pot — too large or tall of a pot can make for a dangerously unstable situation!
The MSR PocketRocket Deluxe backpacking stove weighs 2.9 ounces, packs down small, is easy to use, performs well in the wind, and boils water quickly. It sports fine-tuned simmer control and includes a push-start ignition. It’s also easy to disassemble and clean in the field.
Boiling Speed
You may not think boiling speed matters, but when you’ve spent eight hours on your feet, and all you want is a hot dinner, it matters. Typically, integrated canister stove systems boil water the fastest. The Jetboil was able to boil one liter of water in just two minutes and thirty seconds, whereas the Trangia took a whopping eight minutes.
Wind, temperature, and altitude can play a role in boiling time. Some stoves are better designed for colder conditions at higher elevations, whereas others are more fair-weather stoves. If you plan on hiking at altitude, make sure the stove you select is up for the task.

The MSR PocketRocket Deluxe was our top pick stove thanks to its built-in ignitor, fast boiling times, and packability. Photo: Rebecca Parsons//The Inertia
Windy Conditions
Have you ever tried to cook in the wind? It’s the worst. If you plan on hiking in lots of wind, you’ll want a stove that’s specifically designed for windy conditions. Burners with built-in wind protection, like those found on integrated canister stoves, are best for use in high-wind situations. Also, having a design where the pots sit close to the flame is helpful. Finally, concave burner head designs like the ones found on the Soto WindMaster and MSR PocketRocket Deluxe work great for preserving stove efficiency in the wind.
Ignition
Some backpacking stoves come with a built-in ignitor, whereas others require an external lighter or match. We really appreciated stoves that came with an ignitor, as you simply had to push a button to get the flame going. However, we recommend that you always bring a lighter just in case the built-in ignitor fails you. Built-in ignitors are the single most common failure point in backpacking stoves.
Return to Comparison Table | Return to Top Picks
Editor’s Note: Looking for a larger stove for camping? Check out our Best Camping Stoves guide. For more gear reviews and features on The Inertia, click here.

The Best Backpacking Meals of 2025

